Crochet Sunburst Granny Square Pattern

Crochet Lace Turban with Leaf Tie Pattern is a beautiful combination of elegance, comfort, and timeless handmade style. Whether you are creating it for everyday wear, a thoughtful handmade gift, or a special accessory for someone undergoing hair loss treatment, this delicate design offers both beauty and practicality.
The soft lace texture keeps the turban lightweight, while the decorative leaf ties add a graceful finishing touch that transforms a simple head covering into an eye-catching crochet project.One of the reasons the Crochet Lace Turban with Leaf Tie Pattern has become increasingly popular is its versatility.
It can be made using cotton yarn for warm weather or soft acrylic blends for cooler seasons. The construction is surprisingly approachable for adventurous beginners while remaining enjoyable for experienced crocheters who appreciate textured stitches and elegant shaping. Throughout this tutorial, you will learn each stage using standard US crochet terminology, making it easy to follow from beginning to end.
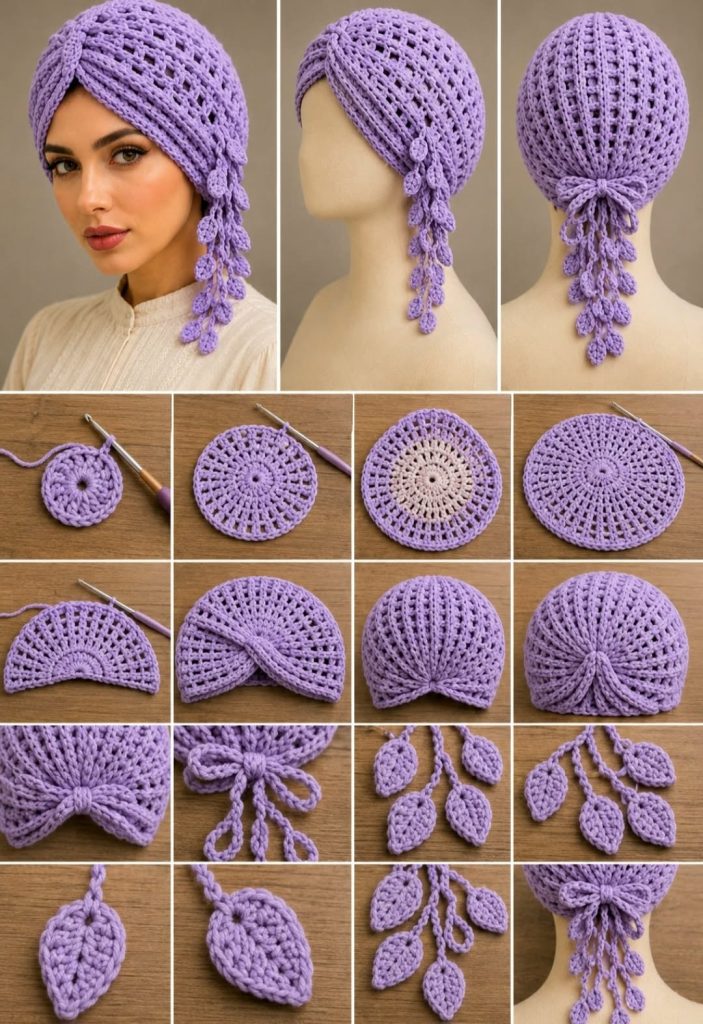
If you enjoy creating wearable crochet accessories that combine fashion with function, this project is an excellent choice. In this detailed guide, you will learn the materials needed, stitch abbreviations, crown construction, lace shaping, front twist formation, back gathering, decorative leaf ties, finishing techniques, and customization ideas. By following each section carefully, you will confidently complete your own Crochet Lace Turban with Leaf Tie Pattern with professional-looking results.
Choosing quality materials is the first step toward achieving a beautiful finished turban. A lightweight worsted weight (#4) cotton or cotton blend yarn provides excellent stitch definition while remaining breathable. Approximately 180–250 yards are generally enough for an adult size.
Recommended hook sizes range from a US G-6 (4.0 mm) to a US 7 (4.5 mm), depending on your personal tension. If your crochet tends to be tight, move up one hook size to preserve the delicate lace appearance.
Additional supplies include yarn scissors, a tapestry needle for weaving in ends, several stitch markers, and a measuring tape. These simple tools make shaping and assembly much easier throughout the project.
Before beginning, make a small gauge swatch. Work a square measuring approximately 4 x 4 inches using the main lace repeat. Adjust your hook size if necessary until your measurements match your intended sizing.
MR – Magic Ring
ch – chain
sl st – slip stitch
sc – single crochet
hdc – half double crochet
dc – double crochet
tr – treble crochet
inc – increase
dec – decrease
sp – space
st – stitch
rep – repeat
Maintaining even stitch tension is one of the biggest secrets to producing attractive lace fabric. Try to keep your yarn flowing smoothly while avoiding overly tight stitches that could reduce the flexibility of the finished turban.
Begin with a Magic Ring.
Round 1: Ch 3 (counts as first dc), work 11 dc into the ring. Join with a sl st. (12 sts)
Round 2: Ch 3, dc in same stitch, 2 dc in each stitch around. Join. (24 sts)
Round 3: Ch 3, dc in next st, 2 dc in following st. Repeat around. (36 sts)
Round 4: Increase evenly around until reaching 48 stitches.
Continue increasing every round while maintaining a flat circle until the crown measures approximately 6½ to 7 inches across for an average adult size.
Once the crown reaches the desired diameter, stop increasing and begin working straight rounds. This allows the fabric to naturally curve downward and create the rounded cap shape.
To create the lace texture, use the following repeat:
Round Pattern:
Ch 3.
Skip next stitch.
Work 1 dc in following stitch.
Ch 1.
Skip next stitch.
Repeat around.
This combination of open spaces and double crochet stitches forms the delicate vertical lace effect visible throughout the turban.
Every fourth round, alternate with a textured rib round:
Front Post Double Crochet (FPdc) around each dc from the previous textured row.
This creates elegant raised vertical ridges while preserving flexibility and stretch.
Continue alternating lace rounds with rib rounds until the piece comfortably reaches the ears.
Measure frequently during construction. The lower edge should comfortably fit around the head without becoming loose.
When the body reaches approximately 8½ to 9 inches in total height, stop crocheting in the round.
Lay the completed cap flat.
Locate the center front.
Fold both front edges toward the center, overlapping approximately 2½ inches.
Pin temporarily using stitch markers.
Using matching yarn, sew only the center overlap together with invisible whip stitches.
Turn the work right side out.
The signature twisted appearance naturally forms from this overlap without requiring complicated shaping.
Next, locate the center back.
Gather approximately 2½ inches of fabric together.
Wrap yarn several times tightly around the gathered section.
Secure with several strong stitches using the tapestry needle.
This creates the elegant gathered finish shown in the completed design.
Now create the decorative tie cords.
Chain approximately 30–40 stitches.
Return with slip stitches along the entire chain.
Repeat until creating 6 to 8 individual cords.
Attach all cords securely to the gathered back section.
Space them evenly so they drape naturally.
Foundation:
Ch 9.
Row 1:
Sc in second chain from hook.
Hdc in next chain.
Dc in next 3 chains.
Hdc in next chain.
Sc in final chain.
Without fastening off, continue working around the opposite side of the foundation chain.
Sc.
Hdc.
Dc.
Dc.
Dc.
Hdc.
Sc.
Sl st into the tip.
Ch 1.
Fasten off leaving a long sewing tail.
Repeat until you have made between 12 and 18 leaves depending on how full you would like the tie decoration to appear.
Sew one leaf to the end of each cord using neat invisible stitches.
Arrange the leaves at different lengths to create a cascading botanical appearance.
The finished leaf ties gently sway during movement, giving the turban an elegant handmade charm.
Once all leaves are attached, inspect every seam carefully. Weave in every yarn tail securely using a tapestry needle, making sure that no loose ends remain visible from either side of the project. Taking extra time during finishing greatly improves both durability and appearance.
Steam blocking is optional but highly recommended for cotton yarn. Hold a steam iron a short distance above the fabric without pressing directly onto the stitches. The gentle steam relaxes the fibers, evens the lace openings, and helps the decorative leaf ties drape naturally.
The Crochet Lace Turban with Leaf Tie Pattern is easy to customize for different head sizes. Simply increase or decrease the crown diameter slightly before working the straight body section. Children’s versions require fewer increase rounds and a shorter body, while larger adult sizes can be achieved by adding additional increase rounds before beginning the lace pattern.
Color selection offers endless creative possibilities. Soft lavender, cream, blush pink, sage green, dusty blue, charcoal gray, and ivory all highlight the lace texture beautifully. Variegated yarn can also create a unique artistic effect, while solid colors emphasize the elegant stitch definition.
For additional embellishment, consider crocheting small flowers, pearls, or tiny buttons to accent the leaf ties. Keep decorations lightweight so they do not affect the comfortable fit of the turban. A minimalist finish often allows the lace pattern to remain the main focal point.
With proper care, your finished Crochet Lace Turban with Leaf Tie Pattern will remain beautiful for years. Hand wash in cool water with mild detergent, gently squeeze out excess moisture without twisting, reshape while damp, and lay flat to dry. This helps preserve both the lace texture and the decorative leaf embellishments.
Is the Crochet Lace Turban with Leaf Tie Pattern suitable for beginners?
Yes. Beginners who are already comfortable with basic stitches such as chain, single crochet, half double crochet, and double crochet can successfully complete this project by following each step carefully.
What yarn works best for this pattern?
Soft cotton or cotton-blend yarn provides excellent stitch definition, breathability, and comfort, making it one of the best choices for this design.
Can I make the turban in different sizes?
Absolutely. Adjust the crown diameter before working the body section, and modify the overall height to fit children, teens, or adults.
Can I use acrylic yarn instead of cotton?
Yes. Acrylic yarn creates a warmer version suitable for cooler seasons, while cotton offers better breathability during warm weather.
How many leaf ties should I make?
Most crocheters create between 6 and 8 cords with 12 to 18 decorative leaves, but you can easily adjust the number to match your personal style.
Does the front twist require sewing?
Yes. The overlapping front section is secured with several invisible stitches to maintain the elegant twisted appearance.
Can I sell finished turbans made from this pattern?
Yes. Handmade finished items are commonly sold at craft fairs and online marketplaces, provided your work is original and complies with any applicable intellectual property rights.
How long does it take to complete this project?
Most crocheters can finish the project within one or two days depending on experience, yarn weight, and the amount of decorative detailing added.
The Crochet Lace Turban with Leaf Tie Pattern is a graceful and rewarding crochet project that combines practical wearability with elegant handmade design. Throughout this article, you learned how to choose the right materials, understand the essential US crochet abbreviations, build the circular crown, work the delicate lace stitch pattern, shape the signature front twist, create the gathered back, crochet decorative leaf ties, and apply professional finishing techniques. By mastering these steps, you can confidently create a stylish accessory that is both comfortable and visually striking.
Whether you crochet this turban for yourself, a loved one, or as a thoughtful handmade gift, the finished piece showcases beautiful craftsmanship and timeless style. I hope this detailed guide inspires you to enjoy every stitch of the process. If you found this tutorial helpful, please leave your honest opinion in the comments and share your suggestions or creative ideas. Your feedback can inspire other crocheters and help make future tutorials even more useful.