
Crochet Sunburst Granny Square Pattern
How to crochet a flat circle Pattern is one of the most useful techniques every crochet enthusiast should learn.
Whether you are a complete beginner or someone looking to improve your crochet skills, understanding how to create a smooth and even circle can completely transform your projects.
From rugs and coasters to hats, bags, and blankets, the flat circle is a fundamental shape used in countless creative designs. Learning this method helps crocheters build confidence while also improving stitch consistency and tension control.
When people first begin exploring How to crochet a flat circle Pattern, they often notice that keeping the circle perfectly flat can sometimes feel challenging. Some circles start curling into bowls, while others become wavy around the edges. Fortunately, these issues are very common and easy to fix once you understand the basic increase formula used in crochet circles. With patience and practice, anyone can master this timeless crochet technique and use it in many beautiful handmade creations.
Another important reason why How to crochet a flat circle Pattern is so popular is because it allows for endless creativity. Crochet circles can be made using different stitches, yarn weights, textures, and color combinations. They can remain simple and minimalistic or become detailed statement pieces with decorative borders and layered patterns. This flexibility makes crochet circles ideal for both functional and decorative projects, which is why this technique continues to be loved by crocheters around the world.
The first thing to understand about How to crochet a flat circle Pattern is that most crochet circles are created using evenly spaced increases. These increases allow the circle to expand outward without curling or folding. The number of stitches added in each round depends on the type of stitch being used, but the principle remains the same throughout the project.
A traditional crochet flat circle usually begins with a magic ring or a small chain loop. Inside this center ring, crocheters work the first set of stitches that forms the foundation of the circle. Starting with a secure center is important because it prevents visible holes and creates a neat finished appearance.
For beginners learning How to crochet a flat circle Pattern, single crochet stitches are often the easiest option. Single crochet circles use fewer stitches per round, making them easier to count and manage. Once comfortable with this method, crocheters can experiment with half-double crochet and double crochet stitches to create larger and faster-growing circles.
One of the most important rules in crochet circles is maintaining a consistent increase pattern. For example, if the first round contains six stitches, the second round usually doubles the stitch count by placing two stitches in every stitch around. Each following round spaces the increases farther apart to maintain a flat shape.
Stitch markers can be incredibly helpful when working on a crochet circle. Since crochet circles are worked continuously or in joined rounds, it can become easy to lose track of the starting point. A stitch marker keeps rounds organized and prevents counting mistakes that may affect the shape of the circle.
Another essential tip when practicing How to crochet a flat circle Pattern is maintaining even tension. Tight stitches can make the circle curl upward, while loose stitches may cause ruffling. Relaxed and consistent tension creates smoother results and gives the finished piece a more professional appearance.
Choosing the right materials can make a huge difference when learning How to crochet a flat circle Pattern. Beginners often benefit from using medium-weight yarn because it is easier to see stitches clearly and provides better control while practicing increases.
Cotton yarn is especially popular for crochet circles used in home décor projects such as placemats, coasters, and table decorations. Cotton provides durability and excellent stitch definition, making it easier to identify mistakes and maintain an even circle shape.
The crochet hook size should always match the yarn recommendation provided on the yarn label. Using a hook that is too small may create stiff stitches, while a larger hook may produce loose and uneven results. Comfortable hook handling also helps reduce hand fatigue during longer crochet sessions.
Sharp scissors and a yarn needle are additional tools commonly used while creating a crochet flat circle. Scissors help trim excess yarn cleanly, while the yarn needle allows crocheters to weave in ends securely for a polished finish.
Many crocheters also enjoy using colorful stitch markers during their projects. These markers are especially useful when working with repetitive increase patterns because they clearly identify the beginning of each round and reduce confusion.
Lighting is another factor that often gets overlooked when learning How to crochet a flat circle Pattern. Good lighting helps crocheters see stitch placement accurately and prevents eye strain during detailed work. Natural light or bright crafting lamps can improve both comfort and accuracy.
Finally, practicing with smooth yarn instead of textured or fuzzy yarn can simplify the learning process. Smooth yarn allows stitches to stand out clearly, making it easier to identify increases, count stitches, and understand the overall structure of the crochet circle.
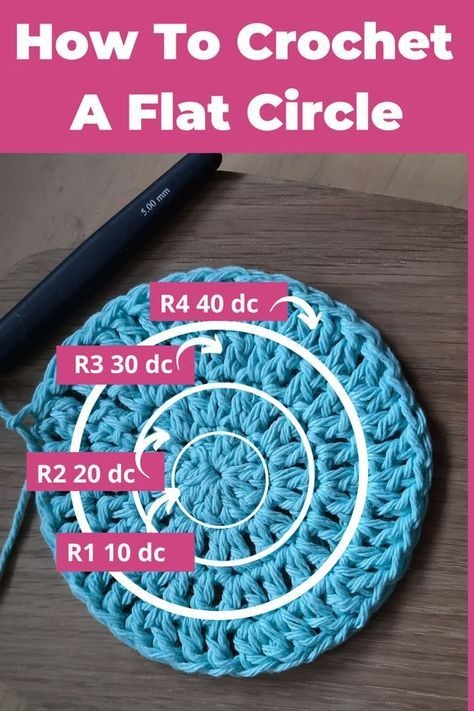
The easiest way to begin How to crochet a flat circle Pattern is by creating a magic ring. This adjustable loop forms the center of the circle and helps eliminate gaps. After making the ring, crochet six single crochet stitches directly into the center.
Once the first round is complete, pull the yarn tail gently to tighten the center. Join the round if needed, depending on whether you prefer working in joined rounds or continuous spirals. Both methods are commonly used in crochet projects.
In the second round, place two single crochet stitches into every stitch around. This doubles the stitch count and allows the circle to expand evenly. At this stage, the circle should remain completely flat without curling or rippling.
For the third round of How to crochet a flat circle Pattern, alternate between one single crochet and one increase. This means placing two stitches into every second stitch around the circle. Maintaining this pattern ensures balanced growth and a symmetrical appearance.
The fourth round follows a similar structure, but increases are spaced farther apart. Crochet one increase into every third stitch around. As the circle grows larger, each round adds more stitches between increases to maintain the flat shape.
Carefully counting stitches during every round is one of the best habits crocheters can develop. Missing increases or adding too many stitches can quickly affect the shape of the project. Taking time to count ensures smoother and more professional results.
As your confidence improves, you can experiment with different stitch types while practicing How to crochet a flat circle Pattern. Double crochet circles grow faster and create a softer texture, while half-double crochet offers a balance between density and flexibility. Each stitch type creates a unique look and feel for different crochet projects.
Once you master How to crochet a flat circle Pattern, the possibilities for creative projects become almost endless. Flat crochet circles can be transformed into rugs, bags, wall decorations, cushion covers, baby blankets, and even fashionable accessories.
Color changes can add personality and visual interest to crochet circles. Many crocheters enjoy using gradient yarn or alternating colors between rounds to create eye-catching designs. This simple technique can completely change the appearance of a project.
Textured stitches are another exciting option for advanced crochet circles. Puff stitches, bobbles, and front-post stitches can create dimension and artistic detail while maintaining the circular structure. These decorative elements make crochet projects feel more unique and handcrafted.
One common mistake beginners make while learning How to crochet a flat circle Pattern is forgetting to distribute increases evenly. Uneven increases can create distorted shapes and visible bumps along the edges. Carefully following the increase sequence prevents this issue.
Another frequent challenge is accidental curling. If the circle starts curving upward like a bowl, it often means there are not enough increases in the round. Adding a few extra increases usually solves the problem and helps flatten the piece again.
On the other hand, if the edges become wavy or ruffled, there may be too many increases. Removing extra stitches or restarting the affected round often restores the smooth shape of the crochet circle. Understanding this balance becomes easier with practice.
Patience plays a huge role in mastering How to crochet a flat circle Pattern. Every crocheter makes mistakes while learning new techniques, but repeated practice gradually improves tension, stitch placement, and counting accuracy. Over time, creating flat crochet circles becomes natural and enjoyable.
A crochet circle usually curls because there are not enough increases in each round. Adding additional increases can help flatten the project.
Wavy edges often happen when too many increases are added. Reducing the number of increases can help maintain a flat shape.
Medium-weight smooth yarn is ideal because it makes stitches easier to see and count.
Yes, double crochet stitches work very well for crochet circles. The increase formula simply changes slightly to accommodate taller stitches.
Crochet flat circles can be used for rugs, coasters, bags, blankets, hats, cushions, and decorative wall art.
No, you can also start with a small chain loop, although many crocheters prefer the cleaner appearance of a magic ring.
Consistent stitch counting, evenly spaced increases, and steady tension all help maintain a symmetrical circle shape.
Absolutely. It is one of the best beginner-friendly crochet techniques because it teaches stitch counting, increases, and tension control.
Learning How to crochet a flat circle Pattern is an essential step for anyone interested in crochet. This simple yet versatile technique opens the door to countless creative possibilities and helps build important crochet skills such as stitch consistency, increase placement, and tension management. By understanding the basic structure of crochet circles and practicing regularly, beginners can quickly gain confidence and create beautiful handmade projects.
Throughout this article, we explored the materials needed, step-by-step instructions, common mistakes, and creative ideas for crochet flat circles. We also answered some of the most common questions people have when learning this technique. With patience and dedication, mastering crochet circles becomes an enjoyable and rewarding experience.
Have you tried making your own crochet flat circle yet? Share your honest opinion, personal experiences, and creative suggestions. Your feedback and ideas can inspire other crochet lovers and help build a supportive crafting community for everyone passionate about crochet.
